Thursday, March 14, 2013

How to Print on Paperbags

K bee's 6th birthday is coming up soon and I needed goodie bags, but wanted to make my own and also didn't want to do a lot of cutting and pasting. I like to make things inexpensive as much as possible, so I look around the house to find things I can make before resorting to buying. So with that said, I found some lunch paper bags that I've had for awhile and made them into simple goodie bags for K bee's class! I went ahead and printed on them. 


Printed Paperbags (by using Word): 


  • Open up Microsoft Word and go to Page Layout. 
  • Go to "Size" and change the size to 5"x10", which is the lunch paperbag size I have. 
  • Depending on where you want your message to go, type your message. Then PRINT! 
                                                     
I had to do some testing on which way the paper bags should be inserted so the right side gets printed. You're going to want to want to feed with the flap side up and top of the bag towards the printer in order to get the correct side printed. 

Pretty Easy! 


Wednesday, March 6, 2013

Miracle in a Jar


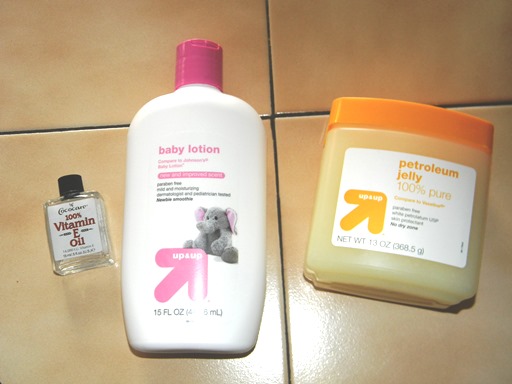
For years I've always bought lotion and have never truly found thee lotion that was all around "perfect" for my skin until now..actually until a month ago. I kept reading this posts on this "awesome" lotion and have always been hesitant on making it. I've bought lotion from any store possible and my bathroom closet is full of half-full bottles that I don't want to throw away. So I am sharing the recipe that I use for this "miracle" lotion. It's the only lotion that I use daily after shower and it has made my skin so very soft. It doesn't make me break out or anything. I rarely use store brand items like lotion, due to my sensitive skin, but Target is by far the best, so I saved a few bucks and use their store brand. I don't like measurements, I just mix the amount according to my liking. This goes to any recipes I use. 

"Miracle in a Jar"

Ingredients: 
  • Baby Lotion 
  • Vaseline
  • Vitamin E (you can get the cream, but I use the oil)
Put all in a bowl and mix it with your mixer until well mixed then transfer to whatever container you want. After using this, you will probably be addicted like I am! 


Tuesday, March 5, 2013

Peeling Garlic

For years, I've always peeled garlic the LONG way, taking apart each one and peeling them each one. Up until recently, I stumbled upon a video that showed how to peel garlic in 10 seconds. I don't remember where I saw it from, so I've been doing it since. In the video, the guy used stainless steel bowl, which I don't have, so I opted for tupperware, it still works the same. Here is a quick tutorial: 


I used to buy peeled garlic for almost $2 a bag because it was easier that way instead of peeling them myself. Now I just buy the bulk for $.99 and save myself the extra $1.