Thursday, April 25, 2013

Growing Celery and Garlic in a Glass

Hello again! Yes, I need to keep up with this blog - as usual, life has been hectic. 

I wanted to share these two little plants that I recently grew in glasses! I was fascinated and wanted to share! I am not much of a gardener nor do I ever have any luck in growing things. I try and try, but I just can't. I have a board on Pinterest with "Gardening Tips" and I use it, but it's just not in the cards. 

A few months ago a few of the garlic cloves I had started sprouting, so I saw on Pinterest that I can plant it and will have numerous amount of cloves. And I must say, the opposite happened and I tried again and same thing. The other day, I took out the peeled garlic I had in the fridge and wouldn't you know, majority of them had sprouted, so I put them in a shot glass and a few days later, they were growing like crazy! 


Next to the garlic is celery. My bees love celery so when I ran out, I decided to put it in water too. Awhile back I saw on Pinterest that you can grow lettuce in a bowl, so why not celery? I'm sure it'll take awhile to reach its "heightness", but it's still pretty cool to grow celery in a glass. 

So let's see - when it comes to planting in dirt, my "green" thumb goes on strike, but if I plant in a glass, it's a "go"?! Well - whatever works! 


Saturday, April 13, 2013

Scribble Pancakes

Good morning! Happy Saturday! I am exhausted from taking care of the bees all night. So here I am with puffy eyes and dragging my feet but I must..I must make a cool breakfast for them. This is why I love Saturdays. I get to make cool breakfast. Cool breakfast usually means something that some adults would not want to eat but the kiddos simply LOVE. 

So instead of coloring the pancakes individually, I just decided to make my own version of these colored pancakes. Ok.. it's the lazy way, but like I said, my feet are dragging and I've yet to finish my coffee, which by the way keeps getting cold and I keep reheating. Anyway, here is what I did: 


I just use regular pancake mix and made my pancakes. Mixed the two food coloring they each wanted and swirled it around with a toothpick. And VOILA! Scribble Pancakes! They look like they got scribbled with markers. 

And they were ecstatic to see the cool breakfast! Yay! Another victory for this mama! 

Now I am off to heat up my coffee....AGAIN.


Friday, April 12, 2013

Vintage Plaid Shirt Refashion

So today I wasn't planning on doing anything but resting. I had an eventful evening/night yesterday. It started off with Baby Bee having a "fingerpainting party" in his crib and that was a mess! Maybe TMI, but tis the life of bees. Anyway, then after I got his sheets washed, after his afternoon nap, it was another. Ay! Then later in the evening, he got his hands into our Plumeria plant (again) and helped himself into the dirt so I had to wash it. Then a few minutes later, he did it again and as I was walking into the kitchen with him, I stepped on to the kid stool that is normally used for time out, but Baby bee loves to use it to push around while crawling. Out of all his toys, he loves this $2.50 stool from Target. Anyway, I stepped on it with baby in arms and tripped over it, my mommy instinct kicked in and wrapped my arms around his head and body and flopped I went onto the kitchen floor. I feel like I flew midair because my legs hurt and bruised, my arms hurt and I banged my head on the oven. So I am as sore as can be and my head aches. And I forgot to put his bumper on the crib and of course mid sleep, Baby bee woke up and saw his leg got stuck between the railings. Aaah! Thankfully he wasn't hurt. 

Anyway - enough complaining. Yesterday I started working on this vintage shirt. I wasn't sure what to do with it at first. I wanted to put some ruffles on the front, but I didn't have enough fabric. Instead, I cut the sides to make it a little slimmer, cut off the sleeves and added a removable flower brooch. And here is the finished product! 

I'm not sure if I'm done or just going to leave it like this. So we'll see.. 


Thursday, April 11, 2013

Vintage Refashion

It has been awhile since I did any updates on this. I've been busy with Spring Cleaning, if you can call it that. I've been trying to Spring Clean for years now. It seems never ending. I'm constantly looking online for motivation on organization and I find a lot of tips, but leave it to me to not utilize these tips! 

Anyway, I posted on Facebook a few days ago on this dress that I bought. It's vintage and absolutely hideous! HA! But I love to buy hideous dresses and refashion them to something "wearable". So for awhile now, I've just been collecting a bunch of vintage dresses and are slowly refashioning them. I've also got a collection of vintage rings that I've redone and also have a collection of vintage purses. When I've got a collection, I will open shop! 

Here is a sample of one of my dresses. I offer no tutorials because: 1.) I don't even know how I do these. I just go with the flow and whatever pops into my head at that moment. 2.) I'm a horrible teacher. If you ask me how I do things, I can just tell you that I just go with it. So I'm sorry. :( 

I've gotten some great tips from friends on how I can "reconstruct" this dress. And thank you, friends! I've added some of their tips to it as well. Anyway, I wanted to keep it simple and sophisticated. I added pleats to the front. So here it is! 


Here is a close up of the pattern. I'm in love with the pattern. 

This was a fun refashion! 


Monday, April 1, 2013

My 3 best (cleaning) friends!


Right when I thought the family was in the clearing of sickness - IT struck one of us! A few weeks ago, I was sick with some type of sickness, thankfully, it only last 3-5 days. Baby Bee had it too so we were both sick. It was so sad seeing him that way. I would lay him down on the floor to change his diaper and I'd leave to get a diaper and I'd come back and he'd still be laying there. Usually he'd be elsewhere and I'd have to find him. Anyway, I got worried and took him to the pediatrician. I'm not one to rush to the doctor's every time my bees get sick but he was so little and it hurt my heart seeing my usual rug rat being so active. And of course, the doctor said he had a virus - I don't remember what he called it, but basically it's a "very bad cold" and no meds will help. Since he's breastfeeding, it will help a lot. And of course he has about 5 teeth coming in, so that doesn't really help. The next day he was feeling better than the day before. Hurray! 

Fast forward to after everyone being sick. Here we are now.. J bee is finally better, well A LOT better. Our Easter break wasn't that great because he was so sick. He's had the nasty stomach flu! He had been throwing up and had diarrhea. We had him confined to his room so he doesn't get anyone else sick, we just got over being sick. When he would come down, we'd have him wear a face mask so he doesn't spread the germs. We took extra precaution only because we have Baby bee who's still building up his immune system and of course K bee and the rest of us. I have never had to deal with the stomach bug, so this is all new to me. So once I figured out what he had, I had my husband stock up on grape juice. I read somewhere on Pinterest that drinking grape juice will keep stomach bugs away. So we drank it like it's our business! K bee was gassy from it! But we'll take gassy vs. the bug any day. So this is what I've been dealing with since my last blog. 

Now that the bug is gone (hopefully), I am sanitizing every nook and cranny of the house. I don't use harsh chemicals in our home, so I've been using the water and vinegar solution (for about 5 years now). The only time people started to get sick is when they started attending school! Anyway, I kicked it up a notch with my disinfectant spray. Here is what I used: 


Disinfectant Spray (measurements are just estimates): 
  • 1/4 cup Rubbing Alcohol
  • 1/4 cup Vinegar
  • 1 cup Water 
In a separate container: 
  • Water and Peroxide mix
Mix them all and spray away! I let it sit on the sprayed area for awhile so it can kill those nasty germs. Then I went back and sprayed again and wipe down. Here are a few things of what I sanitized: 

  • Toothbrushes (soak them in Peroxide for 30 minutes and then rinse in hot water.) 
  • Toilet handles
  • Light switches
  • Bannister
  • Remote controls
  • Door knobs
  • Walls
  • Dining table and the back of chairs
  • Kitchen counter
  • Fridge handle
Every article of clothing/fabric that has been exposed is in the laundry is on HOT! 

You name it, I probably sprayed the crap out of it! Here's to hoping that nasty stomach virus goes away! 


Keep healthy and be well, friends! 


Friday, March 29, 2013

Edible Bird's Nest

Easter is around the corner! Actually, it's this Sunday. I love holidays. Now that I'm a mommy, I enjoy it more. Only because it gives me reasons to cook more, bake more, eat more, and be more silly! And the big plus, my little bees love it! And the best response I get from them, "you're the best mommy in the world!" Who doesn't like hearing that?! Anyway, here's a special treat that I make every Easter. It is fairly simple and it takes about 10 minutes to do. I call it: 


"Edible Bird's Nest"


What you'll need: 
  • Chow Mein Noodles
  • Chocolate
  • Jelly Beans (I used  Sixlets candy since I already had them.)
  • Wax paper
Directions: 
  1. Melt chocolate and mix in chow mein noodles. 
  1. When it's all mixed, scoop out with a teaspoon onto the wax paper.
  1. Drop your little eggs. Refrigerate for 10 mins. 
  1. EAT!
My bees loved them! Such a simple little treat for Easter! 


Thursday, March 28, 2013

DIY Erase Board

Today's DIY project is a dry erase board with supplies that you may have laying around the house. It is fairly easy to make. I made one before using a picture frame, but it didn't work out too well and it ended up breaking. So I needed something I could put on the fridge that we can we can write items we need around the house for when we go grocery shopping, plus the erase board we do have on the fridge is being used for another project. This works out well for us because it is lightweight, has enough space, and it works as well as an erase board! 


What You'll Need: 

  • Scrapbook Paper (I cut mine in half since I didn't need that much space.)
  • Clear contact paper (you can get it at Dollar Tree if you don't have any or Laminate paper
  • Tape (for fridge)
Directions: 
  1. Cut scrapbook paper to measurements you want. 
  2. Apply contact paper/Laminate paper to the scrapbook paper. 
  3. Trim the edges. And you're done! Just use tape to put it on fridge. 
This "erase board" is definitely convenient to have. It falls, we just tape it back up. But I use heavy duty tapes. This is nothing fancy but it gets the job done! 


Wednesday, March 27, 2013

DIY Thread Holder


Here is today's "Do It Yourself" project. It is a thread holder/container. Not until a few weeks ago I realized I had a collection of threads when I would go buy the thread I needed only to realize I had one somewhere in the craft room. So now, I have doubles of thread colors. Since I'm trying to put together my craft room, I needed to be more organized and I hate buying things for organization, if I know there's a way I can make them. And these supplies I found laying around the house. This is only because in the past I've bought things to help me organize, but ended up not using these containers. So here it is the project: 


Supplies: 

  • Plastic container (mine is from a drawer)
  • Bamboo Skewers that I found in my pantry (cut about 2 inches)
  • Glue Gun
Directions: 
  1. Measure about 2 inches between each stick and put a dot. Keep doing this until you are out of room and your container is full of dots. 
  2. Take glue gun and glue the end of a stick and press down on the dot until it's dry and sturdy.

I was able to hold 24 threads in my container! Now I'm organized and it didn't cost me any $! 

Now off to my next project...


Tuesday, March 26, 2013

No candy Easter Eggs!


Easter’s coming up and I’m trying to put together the bees’ baskets. I’m not a fan of putting candies in their baskets, never have been. Nor am I a fan of them eating candy or sweets. Heck, I don’t even buy Capri Suns and slightly feel guilty giving them fruit snacks! I myself, grew up with drinking juice boxes and eating at fast food restaurants, not a lot, but enough. Last year, I put a few candies in their baskets but when they would ask to eat it, I’d say “not yet” or “no.” I know, I know.. I’m horrible. But I did give in and said yes a few times.  Last year’s Easter baskets had coloring books, books, and little stuffed toys and of course the few pieces of candy. I also have an egg hunt for them, which they love!
This year I have filled their eggs with quarters, stickers, tattoos, Squinkies (they LOVE them), and little coupons of activities that they love to do. I think this is a better idea considering they are so active and prefer to do activities rather than sitting in front of the TV, which is good because Mr. Bee and I are not fans of our children being entertained by television, so when they’re able to, weather permitting, we let them play outside. But if they do watch TV, they would have to earn it depending on their behavior at school that day (the school has a behavior color system).


Here are some ideas for their Easter eggs that I’ve come up with:

·         Coins
·         Squinkies
·         Stickers
·         Angry Birds bracelets
·         Coupons
·         Bouncy balls (J bee collects them)
·         Erasers (K bee collects them)

The coupons in the eggs are:

·         You earned 30 minutes of video game.
·         You earned a movie night with your choice of movie.
·         You earned a dessert of your choice.
·         Pick a breakfast of your choice (valid only on weekends).
·         You earned an extra story before bed.
·         You get to stay up 30 minutes after bed time.
·         Watch a show of your choice before bed. 
I
ISome of the things I'm putting in their Easter baskets are silly putty, markers, coloring books, pencils, pens, glow in the dark bracelets, Yo-Yos, etc. 

I'm looking forward to their egg hunt! And this year, it's Baby bee's first Easter! 


Sunday, March 24, 2013

Recycled Lunch Bento Container

I was looking through the "stash"of tupperware I have in the pantry and came across these Chinese food take out containers. I've used them to store markers and crayons for the bees and had extras. Once in awhile the bees want packed lunch and I've always used ziploc bags and got tired of using them. So now, I am reusing my silicone cupcake molds and these takeout containers for their lunch. It fits perfectly into their lunch box! And the best part, all their food is in one container and don't have to hassle with trying to open bags. 


So go look in your pantry and save yourself a couple of $ and reuse takeout containers for your own little bees' bento lunch! 


Toilet Paper Roll Plant Pots

Well, March 20th was the first day of Spring, so I decided to start planting. I've been trying to live as green as possible and finding ways to use everyday items that I have around the house instead of spending money on unnecessary things that I already have. So I've been collecting toilet paper rolls to use as my planting pots so I can just transfer into my garden when they're all ready. As you can see, I have a couple of plants already growing, Spinach and Cucumber. 


What I used: 

  • Toilet paper rolls (cut in half) or Paper towel rolls
  • Potting soil 
  • Seeds
  • Popsicle Sticks for labeling seeds
Now I just need the rest to grow and of course to get warmer so I can transfer them into their permanent home! Last year, we had so many cucumbers! I'll try to update pictures when the rest start to grow! 


Friday, March 22, 2013

My 10 Memory Making With My Bees


The other day, I had a small emotional moment with my 5 year old little girl, my mini me. The conversation went:


"K bee, one day you'll grow up.. you won't be wearing polka dot jackets and dora shoes anymore. And you'll move out of our house..and i'm sad because of that."


 "mom, it's all right.. it won't be til like i'm 70."

I cherish my conversations with my mini because she's growing up too fast. Sometimes I miss her little wobbly 2 year old self. Now she's in Kindergarten, it's definitely bitter sweet. Here is a list I've come up with that helps me make memories with my children that one day (hopefully) they will cherish and carry on to their little minis. 


1. I gave a journal that K Bee and her "fairies" write to each other. In the journal she writes about her feelings or draws them and in turn, the "fairies" write back. This way she's able to express her feelings without the fear of me getting upset at her. Sometimes she lets me read her entries. Maybe next year, we'll move on to a "Mommy and K Bee" journal. Right now, she believes in these fairies and that I don't want to take it away from her. And at night time, she yells out "Good night fairies" from her cozy bed and in turn the fairies yell out, "Good night!". One day, she'll realize who these "fairies" are, but for now..we'll keep that a secret ;-). 


2. Every Friday is "Kid's Choice". This gives them the power to pick dinner. Anything they want, except candy. They normally choose: Chicken nuggets, Pizza, ham and cheese sandwich, or Sushi. They love homemade sushi, especially the seaweed. Whatever they choose, we eat it. Followed by a movie. 


3. Some Saturdays or Sundays, we have "Pajama Day". They get to stay in their PJs all day and night. This is our lazy day. We just watch movies or play games in our PJs. We have played UNO over and over and over. [Probably one of my favorites :)]


4. Indoor Picnics. Once in awhile, we lay a blanket in the middle of the living room and have a picnic. This only works if Baby Bee is confined to his play yard or napping. He's like the ants to our picnic, but in a "godzilla" like form.


5. Every night at dinner, we do 3 good things and 3 bad things. They each take turns telling everyone 3 good things that happened at school and 3 bad things that happened. This way we get to find out about their day and they get to find out ours. 


6. Mommy Dates and Daddy Dates. Daddy Bee and I take turns taking each child out on a date. Sometimes, it's just me and K Bee going to Target or the mall. We go into the stores and she tries on shoes or puts on colorful make up at Sephora. At times, I take J Bee to breakfast and we talk about what's going on or take him with me to  go grocery shopping. He loves to help out with chores too! 


7. Every night, either I or Daddy Bee tuck each of them in and say a prayer with each of them. Their prayer consists of asking for forgiveness for the sins they committed that day and praying for a better day. 


8. Baking cookies or making dinner together. They love to help with cookies and dinner, even if it means opening up the pasta box and mixing the sauce. They are so proud when it's done and it's "sooo good" and I tell them it's because they made it. Their smiles are priceless!


9. We have a rule for gift giving. If they don't have a job, they make their presents. We try to teach them the value of money. That buying things aren't always the best things and sometimes, (if not all the time for parents), homemade presents are always the best presents. We tell them when they get a job, then they can use their money to buy presents, otherwise, they are using someone else's money to buy presents. (I have countless bracelets and countless pictures.)


10. Last but not least, our main rule: Hug and Greet each other everyday, even when we're having a bad day. We make it a rule to hug and say hello. I believe manners start from the home.


This is just a small list of things that we do with our children and I can only hope that they will remember them when they're older and carry on to their little ones. 


Thursday, March 14, 2013

How to Print on Paperbags

K bee's 6th birthday is coming up soon and I needed goodie bags, but wanted to make my own and also didn't want to do a lot of cutting and pasting. I like to make things inexpensive as much as possible, so I look around the house to find things I can make before resorting to buying. So with that said, I found some lunch paper bags that I've had for awhile and made them into simple goodie bags for K bee's class! I went ahead and printed on them. 


Printed Paperbags (by using Word): 


  • Open up Microsoft Word and go to Page Layout. 
  • Go to "Size" and change the size to 5"x10", which is the lunch paperbag size I have. 
  • Depending on where you want your message to go, type your message. Then PRINT! 
                                                     
I had to do some testing on which way the paper bags should be inserted so the right side gets printed. You're going to want to want to feed with the flap side up and top of the bag towards the printer in order to get the correct side printed. 

Pretty Easy! 


Wednesday, March 6, 2013

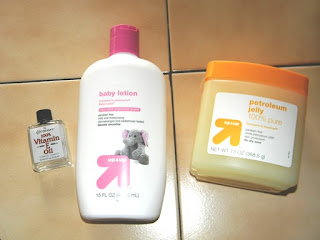
Miracle in a Jar


For years I've always bought lotion and have never truly found thee lotion that was all around "perfect" for my skin until now..actually until a month ago. I kept reading this posts on this "awesome" lotion and have always been hesitant on making it. I've bought lotion from any store possible and my bathroom closet is full of half-full bottles that I don't want to throw away. So I am sharing the recipe that I use for this "miracle" lotion. It's the only lotion that I use daily after shower and it has made my skin so very soft. It doesn't make me break out or anything. I rarely use store brand items like lotion, due to my sensitive skin, but Target is by far the best, so I saved a few bucks and use their store brand. I don't like measurements, I just mix the amount according to my liking. This goes to any recipes I use. 

"Miracle in a Jar"

Ingredients: 
  • Baby Lotion 
  • Vaseline
  • Vitamin E (you can get the cream, but I use the oil)
Put all in a bowl and mix it with your mixer until well mixed then transfer to whatever container you want. After using this, you will probably be addicted like I am! 


Tuesday, March 5, 2013

Peeling Garlic

For years, I've always peeled garlic the LONG way, taking apart each one and peeling them each one. Up until recently, I stumbled upon a video that showed how to peel garlic in 10 seconds. I don't remember where I saw it from, so I've been doing it since. In the video, the guy used stainless steel bowl, which I don't have, so I opted for tupperware, it still works the same. Here is a quick tutorial: 


I used to buy peeled garlic for almost $2 a bag because it was easier that way instead of peeling them myself. Now I just buy the bulk for $.99 and save myself the extra $1. 


Monday, March 4, 2013

Who would have thunk it?!

Last night was a very tiring, restless night. We're re-training Baby Bee in his crib so it was quite "exciting" then K Bee woke up at 12 something hysterically crying because she couldn't sleep. I kept asking her why and she didn't know. She felt a little warm so I had asked if she was hot in bed and said yes so I gave her a shirt to wear instead of her flannel PJs. We went downstairs for a little to see if she could relax a little bit before climbing into bed. A few minutes later, she went back up. Then a few hours later, another knock on our bedroom door, it was J Bee saying his stomach was hurting. I asked if he tried going to the bathroom and said he tried but nothing and that he was hungry! It was about 3am! I rubbed a little Efficascent oil on his belly and told him to climb back into bed. Before bed he complained of a tummy ache too, so I know he wasn't hungry. 

Efficascent Oil is this ointment that is widely used in the Philippines. So I've used growing up and still do and now my family uses it! It is miracle in a bottle for tummy aches! It contains camphor, methyl salicylate and menthol and is used to relieve pain. 
I'm sure you can find in any Asian grocery store. 

So K Bee came home from school complaining her throat is sore and mine is too actually, it started late last night so we're all probably coming down with something. Anyway, I don't remember where I read it from, but marshmallows are great if you have a sore throat. Who would have thunk it?! So we both ate a couple of 'mallows and it worked! 
For sore throat, eat a couple of marsmallows, it relieves the pain. Good Luck and Get Well Soon! 


Friday, March 1, 2013

Dr. Seuss Day!

Today is the little bees' celebration of Dr. Seuss' birthday at their school. Since I missed the deadline to sign up for the special breakfast at school..and mind you.. I never a sign up, I made them breakfast here instead. And last night the bees went to bed early so I had extra time to work on K bee's headpiece. I tried not to make it heavy for her little head. J bee had a choice to be Mr. Brown from "Mr. Brown Can Moo" and the fox from "Fox in Socks" and he chose to be the fox. I was going to make ears for him, but I didn't only because I know he'd mess with it and the whole thing would fall apart before he reaches school. And the best part, it was all put together/made without costing me a cent! 

So here they are with their costumes that I put together this morning: 
Fox's supplies: 

  • Red shirt/red pants (already own)
  • Blue mittens/socks (leftover fabric from my fabric scraps)
I used a glue gun to put together the mittens and I used a tad bit of hot glue to glue the fabric to his shoes. Since it's hot glue, I did a test run to make sure it peels off. And voila! I made the marks on his face with black eyeliner just like Fox has on his. J bee loved it! (He's really not hard to please.) 


The Cat in the Hat Supplies: 

  • The headpiece - plastic white cup (from a mardi gras parade I attended in New Orleans years ago). I covered in white felt with hot glue. Then hot glued red ribbon (from ribbon stash). The ears, are triangle pieces cut out from an...(ahem) old bra. The little foam provided the shape I needed! So I glued the white triangle pieces to it. Glued all the finished pieces to a white headband. 
  • Black shirt/white tank/black pants - she already had in her closet. 
  • White belly - cut out an oval shaped felt and hot glued it to her top. I'm not worried about the top getting ruined because it's an old one. 
  • White paws - again, from felt. 
Tied a red ribbon around her neck, made whiskers with my eyeliner and VOILA! The Cat and the Hat! 


The Breakfast: 


  • A few drops of green food coloring into the eggs, scrambled. Then mini sausage links since I didn't have ham and was not going to go to the store just for ham. I added a drop of red coloring into milk, I didn't want them having an absurd amount of red dye in their system. 
  • A few drops of red dye into pancake batter. I made the white part first then whatever was left over, I put the dye in. Then I added a drop of green dye into milk. 
Yes, the bees loved it! Things like these make me so happy I'm a mother. I've always wanted to make crazy foods. I won't eat them, but they sure do love them! 


Thursday, February 28, 2013

Thrifty Thursday

I've come up with a new thing called "Thrifty Thursday". Every Thursday, I'll post "thrifty" finds from thrift shops, consignment shops, etc. So today is the first "thrifty Thursday" find! 

Today, along with my little partner, Baby Bee, visited our favorite little thrift shop and found some cool things. This by far is my favorite little piece. I love finding eclectic, different, "hmm" items. Somehow when I saw these earrings, it gave me the "hmm.." feeling. And the best part, it only cost me $1. 
At first, if reminded me of something I can find at a Spanish market or maybe if I was vacationing down in Mexico :) Then I looked closely and maybe he's wearing a cowboy hat and he's a cowboy. Regardless, it's my find of the day! And look at those crazy eyes on each set. Kinda freaky, yeah? When I find an outfit, I'll post a pic with them! 


Wednesday, February 27, 2013

Buzzin' by to say hi!


Hi all! Thanks for checking out our bees' nest! 

My crew is the busy bees. We call ourselves The Bee Family. The main bees are Me (mommy bee) and Daddy Bee. We have our little bees: J bee, our 7 year old little boy; K bee, our 5 year old girl, and baby bee, our 9 month old little boy. We got the names because back when K bee was 3yrs old, she used to call my husband "bumble bee" and wherever she went with him, she'd call him bumble bee and the "bee" stuck and we all became the bees! 

Anyway, if you're still reading - then that's good! Inside this bees' nest, I'll be blogging about anything and everything. I don't have specifics - I guess whatever my busy bee's head comes up with!